Building the Street Library
A common question we encounter is "Did you build this?, to which we generaly shrug and say, "sort of".
if you like the look of this street library and would like to make one yourself rest assured it is not very complicated, but you will needs some tools and some time and a litle patience. But it really a simpel case of upcycling.
2002 was a glorious time for street library builders. We are sitting in an age where TVs have been rapidly growing in size and dropping in price, which has seen a complete redisgn of living rooms and living room furniture alogside it. There is a particular class of TV unit then that is no longer useful and popping up in many contexts as a free giveaway, folk first trying to sell them, then trying to pass them to op shops and finally giving up and posting a freebie on Facebook Marketplace or Gumtree or wherever else.
Here's a classic post:

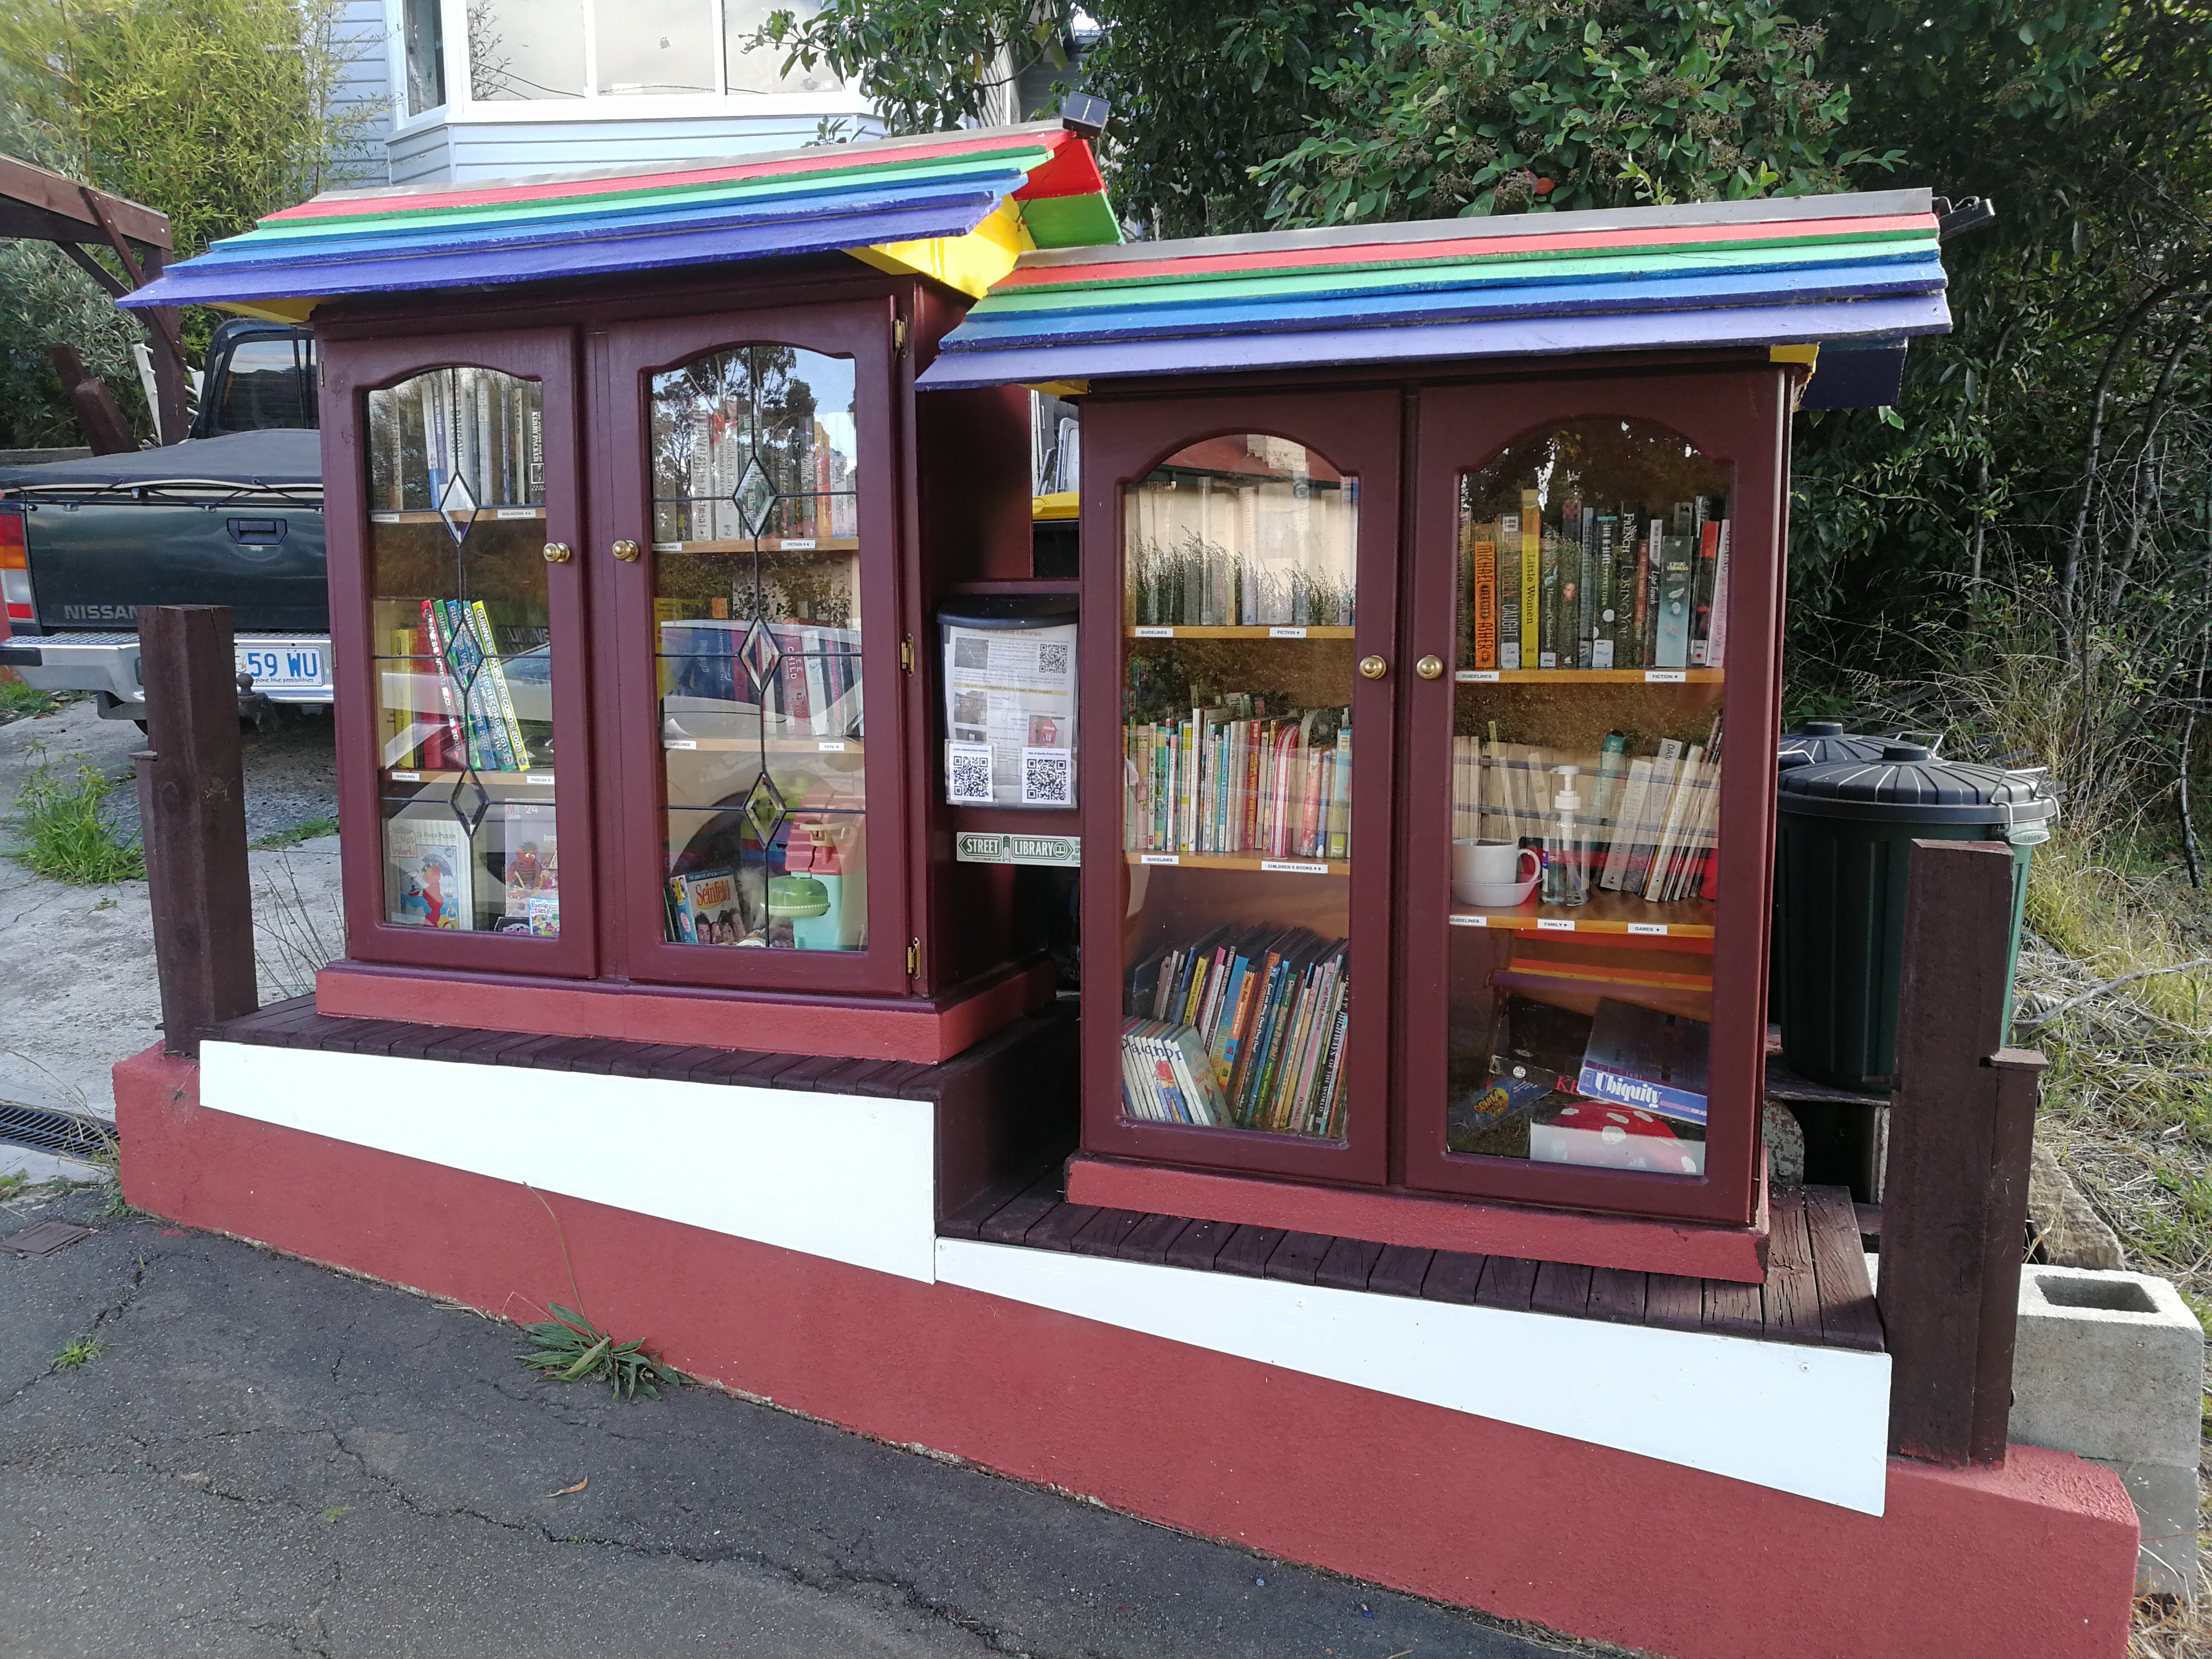
In fact the first stage of the Montagu Street Library was made of exactly one of those. A popular model.
How to Convert a TV Unit to a Street Library
So, you've found one of thos on-line and want to build a street library? The short version is as follows:
- Remove the middle. If you're lucky it just comes apart into three bits, a middle and two sides. happy happy. If not, well, I just ran a circular saw quickly near the inside wall of each of the two sides, to cut the middle out quickly, while leaving a saftey margin. Then I have two sides with some exra material to remove (the safety I left on my quick cut)
- Trim the rest of middle off. At this point using a guide clamped to unit and positioning my saw well, I rip the saw along the remaining bits of the midle flush with the side of the wall of the side unit.
- Glue the two sides together. I then coat one side of one half with construction adhesive and clamp them together and wait for it to dry. This is where they have to be lined up to be square with each other. From the backing of the middle I then cut three strips about 15cm wide and cut to length so I could glue them to the top, bottom and back of the joint between the sides and tack them down on each half with tacks (short nails with flat heads). By the time that's all done the two halves are essentially one again and won't separate very willingly again ;-)
- Build the roof:
- Find some scap timber. Standard 2"x4" is fine for a few rafters, treated pine is easiest to cut and work with but is lying around. Old fence palins are great for topping the roodf with, 3 or 4 palings per side, so 6-8
- Plan the roof. This is not vying for an architectural award, and we want to use scrap timbers, upcycling as we go, so two pairs of rafters each joined at top that rest on the top of the assembled cabinet are fine and these need designing and cutting. I opted for a 30° incline meeting at there middle dropping off front and back, with 4 palings horizontally, overlapping a little tacked to the rafters and a 150mm (15cm) eave front and back and overhang each side. You wnat a decent eave to prevent all but driving horizontal rains reaching the top of the doors where it might run into the cabinet.
- Cut the timbers. The rafters and palings are all then cut to length according to plan. The designe meant cutting a 60° face at the top of each rafter where they meet and a 30° end for the eave with a notch in each rafter so it can rest on the roof.
- Assemble the roof. I glued paired rafters together at top with construction glue and drove a screw into the joint for good measure. When dry, I screwed these down onto the top of the cabinets at each side. Finally from the bottom up nailed the fence palings across the rafters.
- Add some end plates. I used the backing sheet from the centre piece to cut two triangles to cap the ends of the rafters with, simply to enclose the roof space
- Paint. Lots of paint! These are indoor units and have a good mix of pchipboard and MDF and other non-external grade timbers on them. If you have a good one it will be mostly pine, but even then untreated and not for external use. So to maxmise it's outdoor lifespan, I put on three undercoats of external grade sealant and primer across all outside faces, walls, doors, and roof. Then three top coats of external grade paint. For a total of six. This is where you can go wild with colour and imagination of course. I went simply rainbow roof and plain tone body.
- Site the lirbary. It needs a home. The one probelm these TV units pose is they are rather tall and narrow in form, and when loaded with books will be very heavy. While the risk is low, when it's out of doors it will be subject to the extremes of weather (where we are situated that means gale force westerlies are likely from time to time) and the vagaries of human nature (childrend and young adults especially are quite known to hold among their midsts a selct few who will to try and topple structures for the fun of it - when they're youn we call it "kids will be kids" and when they're old enough, we call it "vandalism"). Which means that you will need a solid foundation to put it on, and ideally, to screw it down or brace it. Depending on where you are and your local council's attitude to things, you may find it safest to put it inside your boundary as well, and along the fence line is ideal. I removed a length of fence, and build a platform (as we're on a slope) and mounted ours there.
When done, and we did this twice with two Units, you might end up with something like: